Quantcast
Channel: St. Thomas guild - medieval woodworking, furniture and other crafts
Viewing all 205 articles
Browse latest View live

Furniture on a medieval ceremonial vestment

$
0
0
I am currently in Vienna for a conference (not related to anything medieval) and also able to visit some interesting places in this beautiful city. One of these places is the Schatzkammer in the Neue Burg. In this museum are some early medieval garments on display, as well as some religious relics (such as a piece of the holy cross and the holy lance). As a modern woodworker, the holy cross fragment did not impress me; but in my re-enactment incarnation, of course, was awed by these fine relics.

Furthermore, there were several items on display that were related to the order of the golden fleece (instated by Charles the Bold). Two of them were liturgical vestments (antependium) of the order of the golden fleece dating from between 1425-1440. The vestments are made of linen, embroidered with precious metal and silk threads and adorned with pearls and glass pastes. They show images of the apostles, saints, prophets and other biblical persons, but also some pieces of furniture of the late fourteenth - early fifteenth century. Interestingly, you can see a transition of older types of seating furniture to newer versions. Not all names of the biblical figures were discernible on the vestments, and not all figures could be photographed due to the lighting on the display of the vestments.


On the right is a writing desk with open shelves. The apostle Bartholomew sits in a chair with a high back, with likely a chest under the seating. This is a 15th and 16th century type chair. Some kind of bookshelves. 

 A saint (Jacobus?) sitting on a chair with a high back.

The apostle Matthew sits on a rounded back chair. This type of chair first appears in the 15th century. 
Also here a lectern is shown. 

Prophet Daniel is sitting in a chair with a high rounded back.
 On the right a simple chest with a lock is seen, on the left a movable lectern.

 
King David sits on a throne like chair. Next to him is a lidded chest with a lock.

This saint is sitting on a small bench with a lectern next to him. 
These benches were common during the 15th and 16th century, but also known in the 14th century.

 The prophet Ezekiel is sitting in a chair with a high backrest. 
On the right is a bench and on the left a writing desk.

Job is sitting in a chair with a rounded back. 
The other furniture shown here is a small chest on the right and a lectern with a movable piece.

The prophet Joel is sitting on an X chair with a high back. 
This type first appeared at the end of the 14th century and remained in use into the 15th century. 

 The prophet Zacharias sits on a chair with a high backrest. 
A lectern for writing is shown on the left.

The apostle Judas Thaddaeus is sitting in an x-chair with a turned armrest. 
This type of chair is typical for the second half of the 14th century. It is old-fashioned at the time of the vestment.

Apostle Matthias sits on a high-backed square chair is a chair found in the second half of the 15th century. 
A very modern chair for the vestment. Also a lectern and bookshelves are shown.


 This poor saint does not have any furniture.

 Apostle Andreas.  He sits on a chair, but it is hidden by the clothes of the saint.

The apostle Philippus sits in a square chair with a high backrest.

Apostle Simon sits in another chair with a rounded back. 
An armoire to store books stands next to him.

Last, apostle Thomas sits in a square chair with a high backrest. It looks as if the backrest is turned, making it an old-fashioned chair. A small armoire with bookshelves is next to him.

A medieval gamebox re-visited

$
0
0

When you enter the Kunstkammer in the Kunst Historisches Museum in Vienna, Austria, you immediately stumble upon a beautifully made medieval box for board games. This gamesbox did feature in a previous blog, as well as the accompanying chess pieces that stood model for my courier chess pieces. This gamesbox, however, proved to be far more interesting than anticipated.

The gamesbox dates from the first half of the fourteenth century and contains a board for chess and backgammon. The boards have been beautifully decorated with certosina style inlays in jasper, bone, agate and chalcedony. Certosina is a technique from the Italian renaissance, similar to intarsia, that uses small pieces of other materials to create geometric patterns on wood. The term comes from Certosa Church in Pavia, Italy, where it was used in ornamenting an altarpiece. Most of the certosina patterns can be seen on the edges of the boards and the 'points' and centre of the backgammon board.


 The edges and the outside of the 'points' are heavily decorated in certosina style.

 
A large rose in jasper ornaments the centre of each half of the backgammon board. 
Around it are several other inlaid flowers and geometric patterns.


The most outer squares of the chess board have a certosina geometric pattern decoration, regardless of the fact that the square should be 'white' or 'red' chequered. The white (bone) chequered squares have a small certosina wheel in the centre, the red jasper squares are plain. However 16 of the 'red' squares are different. Here, painted miniatures are hidden behind a rock crystal window.

16 of the 'red' squares of the chess board contain painted miniatures.


Some of the miniatures behind the crystal windows.

The 20 game pieces on display were a surprise for me. I had checked the online database of the museum and only found the 14th century chalcedony and red jasper chess pieces and assumed that these were the 20 game pieces. Actually, the twenty game pieces were 10 chalcedony and 10 red jasper tablemen for backgammon. Actually this is 10 (5 each) pieces short of a complete medieval backgammon set (assuming the rules of quinze tablas of Alphonso X the Wise). To play draughts, only 4 pieces are missing (assuming European layout of the game; for Arabic medieval draughts 12 extra pieces are necessary). The tablemen have a similar size as 'modern' game pieces.


The 'plain' chalcedony and red jasper game pieces for backgammon.

The chess pieces, which are identically made from chalcedony and red jasper, were unfortunately not on display.  I was a bit disappointed in this, as it really would have given a complete image of the complete games box.

The chess set for the games box.

The side of the games box.


Another beautiful, unrelated game piece in the Kunstkammer made from walrus tusk. 
An image of the flight of Alexander the Great is carved in it. Rhineland, around 1200.

The faldistorium in the MAK in Vienna

$
0
0
The faldistorium from the Stift Admont dating from the early 13th century in the Museum fur Angewandte Kunst in Vienna was a real revisit for me. I did visit the museum some 10 years ago. At that time photography was not allowed, and I had only some notes made on paper and a few blurry photos send by the MAK staff (this year I received some excellent photos from them that helped me finish my sella curulis). Now, I went on Tuesday evening, when access is free to the museum.

The glass cage has been 'shopped' away. Nowadays you can only see the front and sides of the folding chair. The chair is painted in red, green, white, yellow-gold and black colours.

The MAK has been refurbished recently, and most of the old displays have moved to new compositions or went to the depot (e.g. the painted medieval table made from cherry and the 15th century folding chair). I had to adjust to the new, more modern design, focus of the museum. The faldistorium had moved from the ground floor to the MAK Design Labor(atory) in the basement, to a long row of chairs; the only being one locked in a plexiglas cage and behind a laser-guided alarm. However, this time photography was allowed.  I took the opportunity to make a many photos of my favourite folding chair, and did set off the alarm three times in the process ...


The Admont faldistorium used to have four lions heads, representing the might of Christ. As one leg is a replacement, there are only three original lions heads left. Each lion is different as can be seen by the beak, snout and the curly hair at the back. 


 At the feet were four (now three) dragon or snake's heads, representing the devil who is defeated by the lions of Christ. The curse to the snake in the Old Testament  (Genesis) 'You shall eat dust the rest of your life' also becomes a symbolic reality in the folding chair. No wonder the dragons look angry. The photos also show the mortise for the lower rail between the two X legs.
 

The upper rail fastening can be seen here. The tenon goes completely through the mortise and has two wedges set to fix it. Furthermore, a pin is put though the tenon (seen on the lower rail).
 

The X is fastened with an iron bolt, and also iron reinforcements on the back of the rail. At least the front disk is not original, the original is hidden behind the disk. I wonder what decoration was shown on it.

This lower rail is a later addition from the 15th century. It shows the arms of the Stift Admont (the red and white diamonds) and that of the abbot Johann von Trautmannsdorf (1466-1481) (the red/white flower) between the emblems of a griffon, eagle, lion and pelican. Next to the pelican you can see on the leg the pin that goes through the tenon. 

The other lower rail is plain and a replacement.

 
Different types of floral patterns are found on different parts of the legs. Tiny white flowers only appear most of the sides, while the green foliage is mainly found on the front of the legs. The backs of the legs are undecorated.

 
I only found out that this leg was made in three parts (or was broken and then fixed). Here you can see the halving joint on the lower part of the leg - and the beautiful floral carving patterns.

 
Also here a 'break' line can be seen on the upper part of the same leg.

  
This more or less sums up where the 'breaks' in the leg are found. Also the replacement leg is shown.  

St. Thomas in India: glass window versus tapestry

$
0
0
When I looked up the painted glass window of the joiners guild in Chartres cathedral (France) on internet, I accidentally stumbled upon another stained glass window depicting the same legend of St. Thomas in India that is on the Thomas tapestry in Wienhausen, Germany. This glass window is in one of the bays of the aisles of Chartres cathedral (see the red arrow on the cathedral map). The window was made between 1205 and 1235. It has a lancet form and is roughly 8.1 m long and 2.2 m wide. In comparison, the Thomas tapestry dates from the late 14th century and measures roughly 4 by 2 m.


It is interesting to compare both legends of St. Thomas and note the similarities and differences. The photos of the windows were made by Dr. Stuart Whatling and taken from his website on medieval glass windows, which is well worth checking out. The legend of St. Thomas starts at the bottom of the window and moves more or less zigzag to the top. The specific details of the reading order are found on this web-page. The detailed images of the Thomas tapestry make use a scanned photo from a book. The original tapestry hangs in Kloster Wienhausen.

The incredulity of the unbelieving St. Thomas. This scene was later in the 13th century added to the window

 Christ sends St. Thomas on a mission to evangelise India ('Ga int lant India').

 St. Thomas is given to Abbanes, an envoy of an Indian king, who seeks an architect.

 St. Thomas and Abbanes travel by boat to India and disembark on the shore.

St. Thomas is welcomed to a marriage feast.

  At the wedding feast Thomas refuses to eat, and is struck by the cupbearer.

The cupbearer is killed by a lion or bear, and a dog brings back the hand that had struck St. Thomas (see previous images).


Abbanes presents St. Thomas to King Gundophorus as his new architect.

 King Gundophorus provides St. Thomas with gold to build his new palace.

  King Gundophorus leaves for a long journey.

 Thomas erects churches instead of building a palace.

 The remainder of the money is divided among the poor.

 The King returns and throws St. Thomas into prison in order to be executed.


The kings brother, Gad, becomes very ill.

 Gad dies and is welcomed into heaven.
 
Gad is shown the palace in heaven that St. Thomas has build for his brother.
 
 Gad is resurrected and reconciles his brother with St. Thomas. Thomas baptises King Gundophorus and his people.


(St. Thomas moves on to the realm of King Mydeus. He converts his wife and children.) 
St. Thomas is captured and thrown into an oven, but survives.

 St. Thomas is commanded by King Mygdeus to worship an heathen idol.

Thomas orders the demon inside the idol to destroy its own temple.

The angry high priest of the temple slays St. Thomas with a sword.

Followers of St. Thomas bury his body.

Pilgrims go to the shrine of St. Thomas.

Pilgrims succumb to sleep at the shrine. St. Thomas returns from the grave to give his blessing to the pilgrims.The last part is only found in the tapestry and not part of the official 'lives' of the Saint.

Angels watch from above.

The medieval toolchest: the plane (part 4) - metal planes

$
0
0
The medieval plane history is not finished yet, although it becomes more speculative here. In this part some planes made from metal are presented.
 

Medieval metal planes

There is one illumination of the John the Fearless planes that had not been shown yet. It concerns an illumination of St. Andreas in the Book of Hours of John the Fearless. On this image levels are depicted on the right side and planes on the left side. The planes appear to be made of metal (also suggested by W.L. Goodman in the History of Woodworking Tools (page 60)). The plane iron is set at a very low angle, while the grip is curved forward. Metal planes were common in Roman times, but have not been depicted elsewhere or found during medieval times. The early renaissance period (16th century), however, does have some metal planes that have survived, bearing some similarity to the metal plane of John the Fearless. Though it is, of course, possible that the metal plane in the illumination only resembles the (non-functional?) 'gold' planes that the duke had ordered by his goldsmith.
The metal planes (including one large) are shown on the left side on this illumination of St. Andreas. 
Book of Hours of John the Fearless. Bibliotheque Nationale de France, Paris, Ms N.A.L. 3055, folio 172v.

Two of the metal planes that have some resemblance to metal plane of John the Fearless happened to reside at the Museum für Angewandte Kunst in Vienna, Austria. However, they are not on display. The only way to see them is to make an appointment with the curator (Elisabeth Schmuttermeier) to visit the depot in the cellars. I was very glad that I thus was able to see them, to hold them (with gloves) in my hands and to take photos of them. Unfortunately for you, I had to sign that the photo's are restricted for private use only. Therefore, the only thing I can share are already published photos, my drawings and measurements and my experiences with these 16th century planes. Both planes are of the type 'vergratthobel', a plane type that resembles the modern low-angle blockplanes and was used to make perfectly fitted angled joints of frames (e.g. of paintings). The word 'Vergratten' means 'to fit together' in German joinery terms.


The small 16th century vergratthobel from the MAK in Vienna. The photo is scanned from Die Geschichte des Hobels by J.M. Greber. The drawing is mine based on the measurements in the MAK.

The smallest plane, and the most cute one, MAK F. 1316 is 13 cm in length (11 cm according to Greber), has a height of 4 cm and a width of 5.5 cm. The plane body is made out of three pieces of metal. The sole has a wide opening (1 by 3.8 cm) for the iron. The iron is set at an angle of 32 degrees (27 according to Greber). At one end it rests on the metal rim of the plane, where the sharp end of the iron rests is unclear. The plane looks hollow inside, however the iron has to rest against some kind of frog. The iron itself is 2.9 cm wide with a thickness of 3.8 mm. The length of the iron is almost 10 cm. The wedge consists of an irregular shaped piece of metal, 2.8 mm thick, 3.45 cm wide and 6 cm long, with a small wooden peg wedged between the iron and the metal wedge. The wedge is set against a bolt with a diameter of  5-6 mm. The front part of the plane is decorated and ends in a curl (like an opened tin of sardines). This curl also has some decoration itself.

The plane felt relatively heavy my hand, just a bit more than a Lee Nielsen 62.5 low angle plane. But it is quite comfortable to hold, and I would not mind having such a (replica) plane in my collection.


The large16th century vergratthobel with the wedge sculpted as a head from the MAK in Vienna. 
The photo is scanned from Die Geschichte des Hobels by J.M. Greber.

The second plane, MAK F. 1314, is larger and has a total length of 23.6 cm (20 cm sole length according to Greber) and a width of 5.8 cm. The sole has a thickness of 6.3 mm with a very small opening for the iron of 2.8 mm by 4.5 cm. Onto the sole, a smaller metal box - the plane body - is fixed. This box measures 18.6 by 5 cm. The height of the plane is 4.1 cm, the sculpted wedge more or less doubles it to 10 cm. The iron of this plane is set at an angle of 30 degrees and has a width of 3.8 cm and a length of 13 cm. The iron is held by the sculpted wooden wedge (carved as a man's face with a moustache). The carved wedge also serves as a handhold to push the plane forward.  Aside from the carved wedge, the plane has some simple decorations. For instance the bolt has some decorative curves. The toat consists of a curved piece of metal, extending 5.2 cm from the box of the plane body. It reaches a height of 6.2 cm. 

 My drawing based on the measurements of the large 16th century plane in the MAK, Vienna.


This plane is quite heavy, like a metal number 5 jack plane. The frontal grip is comfortable to hold, but the wedge/handhold at the back feels awkward. In my opinion it is too bulky. There are two holes in the plane: one square in the sole, and a round one in the toat. The holes were probably used for hanging the plane onto a pin on the wall.

Finally, the MAK did also have another type of  metal plane (F 1313), dating from the second half of the 16th century. The plane is a small fore plane (according to Greber) with a toat. It measures 14.2 cm (13.8 according to Greber) is 4 cm wide and 3.8 cm high (+ 4 cm for the toat). The diameter of the toat is 1.8 cm. At the end is a square metal bolt, used to loosen the iron. The blade iron is set at an angle of 45 degrees; the opening for the blade in the sole is 7.5 mm. The plane iron look very peculiar: it is shaped like the teeth of Dracula. At both ends the blade has protruding points, the reason for this is unclear for me.

The 16th century etched fore plane from the MAK in Vienna. 
The photo is scanned from Die Geschichte des Hobels by J.M. Greber.

The body of the plane is fully etched with floral designs; even the sole of the plane has these etchings! yet the sole is till quite smooth. This etching looks similar to that of two metal planes from 1570 belonging to the Kurfürst August of Saxony (now in the Staatlichen Kunstsammlungen in Dresden, Germany). The MAK plane is a bit lighter than the small Vergratthobel. For me, this plane it is too small to hold and work comfortably.

Smoothing planes made by Leonhard Danner (1507-1585) in Nürnberg around 1570 for Kurfurst August of Saxony. Top plane: Length 12.7 cm Width 3.8 cm Height with toat 8.0 cm Weight 511 g. Bottom plane: Lenght 12.7 cm Width 4.8 cm Height with toat 9.6 cm Weight 642 g. The planes are decorated with hunting scenes and floral designs. The plane iron is fixed with a screw instead of a wedge. Images from the SKD museum, Dresden, Germany.

Sources:

Goodman, W.L., 1964. The history of woodworking tools. Bell and Hymann Ltd, London, UK.
Greber. J.M. 1987. Die geschichte des Hobels – von der Steinzeit bis zur Entstehung der Holzwerkzeugfabriken im fruhen 19. Jahrhundert. Th. Schafer, Hannover, Germany. ISBN 3-88746-188-6 [In German].

New cookbooks and an old with a new recipe

$
0
0
During Saint Nicholas and Christmas time I have received and bought some new (at least for me) medieval cookbooks. These were:


'The Book of Sent Sovi', containing the recipes of a 14th century cookbook from Catalonia (Spain) (ISBN 978-185566164-6). Luckily for us, the Catalan language is translated into English, but the actual transition to modern cooking has to be done by ourselves.

'Das Mittelalter Kochbuch' by Hannele Klemettilä (a German translation of an English translation of a Finnish book; ISBN 978-3-7306-0028-3) is filled with general information on medieval cooking, and contains a collection of recipes from medieval cookbooks and by Finnish re-enactors. There is some uncertainty whether the dishes by the latter are indeed medieval as no manuscript source is provided. Also some interesting information on Finnish medieval food can be found in the book.

'Herrenspeis and Bauernspeis - Krumme Krappfen, Ollapotrida und Mamonia' (ISBN 978-3-936622-14-0), 'Mein new Kochbuch - Wurst von Salm, Salbeimauschen und weitere Rezepte aus der mittelalterliche  Burgküche' (ISBN 3-936622-64-7) and 'Orientalisch-mittelalterliche Küche' (ISBN 978-3-940168-44-3) are all three by Peter Lutz, the former medieval cook of the Ronnenburg in Germany. These last three book are written in a very entertaining and informative way, and his view of how to prepare medieval dishes is very like our style of cooking. His last book deals with the medieval Islamic food and the influence it had on European (Mediterranean) medieval cooking. One of the dishes in this book, Rummaniyya, can also be found in the the Italian 'Liber de coquina' from the beginning of the 14th century as 'Romania'. This a a meat dish with a pomegranate sauce. A related recipe, 'Limonia' (with a lemon sauce instead of a pomegranate sauce) is Katinka's favourite medieval dish. 'Mein new Kochbuch' mostly takes the recipes from the late medieval/early renaissance cookbook 'Ein new Kochbuch' by Max Rumpolt from 1581. However, Peter uses the extensive information on cooking found in Max Rumpolts book to find out how certain medieval cooking styles were performed. The recipes in this book are not those commonly encountered in modern medieval cookbooks.

Recipe of Rosijsen from the manuscript of Maister Hannsen des from Wirtenberg koch from 1460.

His first book, Herrenspeis und bauernspeis, starts with a recipe of 'Krumme krapfen'. We knew this recipe already from another book under the name 'Rosijsen' (Horse shoes) and have made it several times. The other book, however, did not provide the source, while peter Lutz provides at least two: The manuscript of "Maister Hannsen, des von Wirtenberg koch" from 1460 and the 'Alemannische Büchlein von guter Speise'  (1470). The latter one also adds that the horse shoes are good and healthy. Indeed they taste very well, but today we would have some doubts on the healthiness of this dish.

Rosijsen


When eaten it looks like a horse shoe. You shall take good cheese and grate it. And take a same amount of flour and add eggs. So it can be kneaded easily. Add spices to it and roll it on a dish like a sausage. Bent it like a horse shoe and bake it in lard. [my translation of the German recipe] 

Ingredients (serves 4):
3 eggs
150 g grated cheese
150 g flour
salt, black pepper, nutmeg
lard or vegetable oil for frying


Make a smooth dough from the eggs cheese, flour, salt and a good amount of spices and let it rest for 20 minutes. Flour your hands and roll the dough into a sausage with the thickness of a thumb. Cut it into pieces of a finger length and form into a horse shoe. Fry the horse shoes in the hot lard or vegetable oil until they are gold-brown and crispy. Eat warm (with a sauce, but it tastes also good without one).

Salse von Weichseln (sour cherry sauce)

Peter Lutz recommends this sauce with the Rosijsen - which I have not tried yet. The recipe is from  'Das Kochbuch des Meisters Eberhard' (mid 15th century) who was the cook of Duke Henry of Landshut in Germany.

Zum ein salsenn von weichselnn zu machen.
Item wiltu machen ein gutte salsenn von weichselnn,
so thue die weichsell in einen hafen vnd
secz die auff ein glut vnd laß sie siedenn vnd
laß dann wider erkaltenn vnd streich sie durch ein
tuch vnd thue sie dann wider in den hafenn vnd
secz sie auff ein glut vnd laß sie wol sieden
vnd rurr sie, piß sie dick wirt, vnd thue dann
honig dar an vnd geribens prot vnd negellein vnd
gut gestu:ep vnd thue sie in ein feßlein. Sie
pleibt dir gut drew oder vier iar.


To make a sauce of sour cherries [translation into English by Volker Bach].
If you wish to make a good sauce of sour cherries, put the cherries into a pot and place it on the embers and let them boil. Then cool down again and pass them through a cloth, put it back into the pot, place it on the embers and let it boil well until it thickens. Then add honey and grated bread and cloves and good spice powder and put it into a small cask. It will stay good three or four years.

 
The sour cherry sauce with the rosijsen. Image scanned from the book Herrenspeis und Bauernspeis.

Ingredients (serves 4):
  • 1 glass of sour cherries
  • 100 g honey
  • breadcrumbs to thicken the sauce
  • cinnamon
  • cloves, freshly ground in a mortar
  • black pepper, also freshly ground 

Take the stone out of the sour cherriesand mash the stoneless cherries to pulp (e.g. with help of a blender). Heat the cherrypulp on a small flame untill it is reduced by a third in volume. Add the honey and the breadcrumbs while constantly stirring until the sauce has thickened. Finally add the cinnamon, cloves and a little pepper.  If the sauce is added hot into clean jam bottles, it can be stored for several years.

Mystery tools

$
0
0
This month (and the previous one) will be a bit meagre in posts from me. I am moving house and most of my attention goes to painting and construction (and installing a workshop), instead of blogging or medieval woodwork. I thought the following image of Noah building the Ark from the Bedford Hours of 1423 (British Library Add. MS 18850) would be appropriate for this situation. 


The illumination shows a lot of woodworkers and their tools. Part of this image is in fact also used in the title of the St. Thomasguild blog. Hammers and mallets are shown most, 4 and 7 times, respectively. But there are also 6 augers, 1 brace, 3 chisels, 2 saws, 3 planes and 4 axes. But there are two other interesting objects shown on this illumination: one man on the roof is nailing wooden boards. He has a special shaped box for holding his nails with a hook that prevents it from sliding down.

 
The other mysterious object is with the man in the house. What is he doing and what is the black object he is working with? Is it a reel for a (chalk or strait) line or is it his purse? Does anyone have an idea? 


The medieval toolchest: the plane (part 5): moulding planes

$
0
0
Moulding planes are planes that serve a special function: shaving a specific form or mould into the wood, such as a decorative edge or concave or convex forms. Nowadays, the functions of these planes have been taken over by electric routers. During medieval times some moulding planes are thought to have existed; the round and hollow planes. But no such planes, except for some early medieval planes from Funen, have survived from the medieval period. All other evidence is only indirect.


Roman moulding plane irons. Image scanned from 'Die geschichte des hobels' by Joseph Greber.


Many surviving irons from Roman moulding planes, round and hollow planes and rabbet planes have been found in Roman fortresses, like Saalburg (Germany). Some (complete) round and hollow planes were found on the 16th century ship Mary Rose. There is no reason why these planes would not have existed in the time period in between. Also, parchemin and linenfold panels, either in furniture or as wall panels, came into fashion during the 15th century. This type of panel can be carved or scraped, but more likely they were made using hollow and round planes. Planing is not only easier, it is also faster, giving a more reproducible product and a smoother end result. And especially this smooth result is found on the medieval parchemin and linenfold panels.


Some of the moulding planes excavated from the Mary Rose (1545). Photo: Moulding planes 81A1040 (flared wedge) and 81A1039 (pinned wedge), both made from boxwood (image from Mary Rose website). Moulding plane 81A1425 made from oak with a side peg (length 30.8 cm). Both plane drawings are from the book 'Before the Mast - Life and death aboard the Mary Rose' by J. Gardiner (ISBN 9781842175040).


Hollow plane irons from the Nova Zembla expedition (1596) by Willem Barentz. 
Photo copyright by the Rijksmuseum, Amsterdam, the Netherlands.


The intarsia panels (1477) in the choir of the San Petronio church in Bologna (Italy) do show two planes that have the same characteristics of the rabbet and moulding planes that were in use during the last century: an open side, where shavings van be ejected. These planes have a single iron held by a wooden peg.


The two planes hanging on the right of the panel look like moulding planes. The top one has the plane iron all through the wooden stock - as with a rabbet plane, while the bottom one shows the typical open side for ejection of the shavings.


Ship-like form planes


The three Vimose planes. Images from the book 'Die geschichte des Hobels' by J. Greber. 


The moulding planes from Vimose on the island Funen (Denmark) have a special ship-like form and date between 300 and 400 AD. One plane is complete and measures 26 cm long with a width between 1.6 and 3.8 cm and a height of 2.7 cm.  The iron was fixed with a bolt and wedge, and was only 15 mm wide. The angle of the iron was around 50 degrees. The two other planes are broken with some parts missing, but have similar dimensions. Also some runic inscription were found on the planes. The planes are thought to have been used for smoothing spear-shafts.

The parts of Vimose planes 2 and 3 have been thought to fit together, but Greber correctly remarked that the bolt holes do not match, and thus they should be two separate planes. On the right part you can see a runic inscription. Image from the Nationalmuseet in Copenhagen, Denmark.

A nice replica of the Vimose plane has been made by Stewart Would. 
The construction process of his plane can be found on his blog.

Another similar formed plane was found in Nydam Moor, Denmark (200-400 AD), though it is unknown to me if this plane also is a hollow moulding plane. The amount of quivers and spear-shafts found in the bog makes it likely that this plane served a similar function. Another such a ship-form plane, though dating from the 11th century, has been found in Dublin, Ireland. Only half of this plane survived; when doubling the size, the plane would have been around 46 cm long and 5 cm high (the plane is reproduced at scale 1:1 in the article).


This is a similar plane from Nydam Moor, Denmark. Image from the Nationalmuseet in Copenhagen, Denmark.

Half of a ship-form smoothing plane, excavated in Dublin, Ireland. 
Image scanned from 'The High Street Excavations' by B. O'Riordain (1976) - Proceedings of the 7th Viking congress.


Rabbet and rabbet-like planes

One can say that the rabbet (or rebate) plane is derived from the moulding plane or the other way around.  For the rabbet plane the iron is straight, while for the moulding plane it is curved. The blades are held similarly with a wedge and shavings are ejected from the side. Rabbet planes have their iron slightly protruding from the sides of the plane and are used to make grooves in or at the edges of wooden planks. Specialist rabbet planes are the tongue and groove planes and the plow (or plough). A large tongue plane (with the size of a try plane) is found in the illumination of Noah building the ark in the Bedford Hours (1423). The plane shows two irons, while two separate shavings are ejected from the plane, suggesting that the carpenter is shaving a tongue.


Detail of the illumination of Noah building the Ark in the Bedford Hours (1423) showing a large plane with two irons suggesting a tongue type of plane. Note that the wooden board does not yet have a planed tongue. 
British Library, London, UK. Manuscript Add. MS 18850, folio15v.


Finally there is an inventory from a Dutch joiner from the mid 15th century, mentioning a plough. This plane can be seen as an advanced type of rabbet plane, with adjustable width and depth settings. Both examples are indicative that the more simple rabbet planes also must have existed at that time.


Our moulding and rabbet planes


Our moulding planes consists of a set of 17 matching round and hollow planes (one is missing), of increasing width. They date from the early 20th century and were made by Peter Duessing, a German plane manufacturer from Anholt, who also supplied the Dutch market. These round and hollow planes were used to make the parchemin panels for the toolchest, in which they now rest. Our rabbet planes are from different manufacturers and adjusted to the same look of the moulding planes. They have also different widths. All planes are made of beech.

Our set of round and hollow planes. The size (in inches) is given on the head, as well as the mark PD with a crown (for Peter Duessing) and the mark ITH, with the initials of the former (unknown) owner.


The components of a hollow and a round moulding plane.


One of our rabbet planes (this one made by Nooitgedacht) that was decorated in the same style as the moulding planes.


A strange trestle table from 1350

$
0
0

This miniature is from 1350 and shows two trestle tables - one large used by the king for dining (it looks like he is getting a medieval hamburger ... ), and one smaller side table for drinks. What is curious about the trestles is that the legs are placed very central on the bottom rail. The bottom rail on the other hand is very long; even larger than the width of the table board. This is the first time I see an illumination of such trestles, which look a bit unstable to me. I do, however, like the decoration on the bottom rails. Unfortunately, I do not have the source of this illumination.

(Medieval) moving house

$
0
0
Today Anne and Marijn will be moving house. I have looked if there are any medieval miniatures depicting a similar situation and came up with these two images. Both images use carts to transport military equipment, but I guess the same horse and cart can be used to transport your household stuff and furniture. 

This image is from Bodleian MS 264 folio 83 verso, dating from around 1340 by the Flemish illuminator Jehan de Grise.

This is from an early 14th century manuscript. The cart is being loaded with stuff (booty?)

A late 15th century folding chair: the sedia tenaglia

$
0
0
The sedia tenaglia is a folding chair with a backrest that first appeared in the late 15th century and persisted throughout the 16th century. Its main area of production was Italy, but these chairs were also found in the Alpine region (Switzerland, France and Austria). It is curious that these x-chairs appeared so late on the medieval scene, as the basic construction is not very different from the Savonarola chair or the late 14th century x-chair, but their seating is far more comfortable (at least my replica is). The main difference with the other x-chairs is that the X is projected at the side of the chair, instead at the front. This makes it possible to extent the legs of the X on one side and to create a (comfortable) backrest.

These two chairs  are from the Museo Storico della Caccia e del Territorio in Cerreto Guidi (Florence) Italy. They were made in Tuscany, date from the 15th-16th century and are made from walnut. The height is 78 cm, the width 37 cm and a depth of 26.5 cm. The seating is quite high, I guess around 50 cm (our seating height is around 43 cm). Both chairs have 7 back legs and a decorated back with circles.

Quite some pieces of the sedia tenaglia have survived and can be found in museums around the world or even be bought at antique houses. The surviving chairs are mostly made from walnut or beech. Beech has the benefit that it is easily bended by steam. The number of legs (for the backrest; the other legs usually number one less) can be an odd or even number and varies between 5 and 7. The wooden plate for the back is usually decorated with circular patterns with a cross in the middle. The following photos give a nice impression of the variety and sizes of the folding chair. The sources of the images are indicated; else they come from museum websites or other places on internet. One of the next posts will concern my construction of a sedia tenaglia.


This late 15th, or early 16th century chair is for sale at an antique dealer for 4800 dollar (at the time this post was written). The following photos show the specific details of the chair. The chair is 80 cm high, 43 cm wide and also 43 cm deep. The wood used for construction is beech.


You can see the wooden hinge dowels between the legs and seating rods.

Not only the back plate is decorated, also the legs and seating have some carved decoration.


The foot rail at the back is fastened with two dowels in the middle (left), 
while the foot rail at the front has two dowels at the ends (right). 

 
The circular decoration of the back plate. The backplate is fastened to the legs with two dowels at either ends.

The back side of the chair. The side of the chair; strangely the front legs look larger than the back legs.


The following six photos of a sedia tenaglia were made by Gary Halstead in a museum in Strasbourg, France. The chair originates from Switzerland or northern Italy and dates from the 15th century. The chair is made of beech and has seven legs. The photos were found on the greydragon website

 The seating of this chair is not very deep.

These two photos of the backplate show that it was fastened by two dowels at the ends. You can also clearly see that the decoration was made by hitting special punches into the wood.

The outer seating rails are larger and have a sawn out decoration. You can see that the legs are still a bit rough and bear the saw marks.


A sedia tenaglia from Tirol, dating from the 16th-17th century. Kunstgewerbemuseum, Berlin, Germany. 
Height 90 cm, width 46 cm. The chair has six legs. Image from the book 'Oude Meubels' by Sigrid Muller-Christensen.

A simple French sedia tenaglia from the late 15th - early 16th century. Château de la Rochelambert, St. Paulien, France. As the chair is quite fragmented, some construction details, like the front dowel, can be clearly seen. The chair has six front legs as well as six back legs.Image scanned from the book Mobilier moyen-aye - renaissance by Monica Burckhardt.

This sedia tenaglia can be seen in the Museum fur Angewandte Kunst in Frankfurt, Germany. The chair has likely 5 legs.
Behind the table a sedia savonarola can be seen.


This is the only contemporary image I could find of a sedia tenaglia. It appears in the clothing book 'Trachtenbuch' of Matthaus Schwartz of Augsburg, in an image of 1538 when he is 41 years old. The chair is small and only has 4 legs at each side.

These two chairs (3 photos) are from the Palazzo Madama in Turin, Italy and date from the 15th century. 
They have similar decorations as the one of the auction, circles with a cross. The 7 legs of these chairs are bend.

Left: A sedia tenaglia made in Italy from beechwood. It has a height of 80 cm, a depth of 48.8 cm and a width of 51.3 cm. The seating height is 47 cm. The chair has 5 legs and a decorated back plate. The chair is now on display at the Philadelphia Museum of Art, Philadelphia, PA, USA. Right: A sedia tenaglia with seven legs dating from the early 16th century and made from beech. 86.5 cm height, 44 cm width and 27.5 cm deep. Castello Sforzesco, Milan, Italy. Image from the book Mobel Europas II-Renaissance - Manierismus by G. Windisch-Graetz.

Left: A sedia tenaglia made in Italy from beechwood. It has a height of 80 cm, a depth of 48.8 cm and a width of 51.3 cm. The seating height is 47 cm (yes, similar to the chair above). The chair has 6 legs and decorated legs and back plate. The chair is also from the Philadelphia Museum of Art, Philadelphia, PA, USA. Right: This sedia tenaglia from the Morando Bolognini Museum, Sant'Angelo Lodigiano, Italy dates from 1490-1510. The sizes of this chair are: height 84 cm, width 37 cm and depth 29 cm. This chair has only 5 legs and misses the two outer seating rails.


A 16th century sedia tenaglia  from Burg Kreuzenstern near Vienna, Austria in seating and folded position. The chair has 6 legs and is made from beech, 80 cm high, 45 cm wide and 43 cm deep. Image from the book Mobel Europas I -Romanik - Gotik by G. Windisch-Graetz.


Left: Decorated folding chair with 6 legs from Tuscany. There is a bend  of the legs at the seating level. Collection Nella Longari, Milan, Italy. Right: Chair originating from Saluzzo, end of the 15th century. Italian private collection. Both images scanned from the book 'Il quattrocento - Mobili - Arti decorative - Costume' .

Eastern at Castle Hernen

$
0
0
Today and tomorrow (Eastern) we are guests at Castle Hernen (Hernen, the Netherlands), one of the castles of the 'Geldersch Landschap and Kastelen'. We were very surprised and pleased that some new furnishing was placed in the castle. When we had an appointment at the castle last year, all the rooms were quite empty, but now the castle was very alive and attractive. We even could make use of the great hall, where we could dine as if we indeed were the lords of Hernen. 

 
We had a very privileged lunch at the U-sided table. 
There was one slight disappointment: there were no servants to help us ...

During the afternoon, Bram and I were working on a medieval chest, while Anne and Katinka were embroidering inside - under the scrutinizing eyes of the many visitors. Some more photos of castle Hernen with the Thomasguild can be found on the Facebook site of the castle.

 Also Katinka has nearly finished embroidering her first panel of the Thomasteppich.

Bram and I are discussing which medieval plane is the better one: 
Bram's 14th century north German plane, or my medieval Italian plane. 

  
 We needed help from Anne to decide which plane was the best.

 To my surprise Anne did choose the plane of Bram: the toat  felt very smooth according to her.

 Ah! Now I know why. The toat! It resembles something ...

Making a sedia tenaglia - part 1

$
0
0
We use our medieval replica furniture not only during re-enactment (such as at castle Hernen), but also in everyday live. Most folding chairs as well as my strycsitten are arranged along the dining table. As we were already planning to move to a new and larger house, there was a need for a larger table and extra chairs as well.  I did want to make a different medieval chair and try to steam bend some wood as well, so my choice was to make a sedia tenaglia.

As photos and information on internet only tell you the height and width of a chair, and not the thickness of the wood used, I looked at an example that was easily available: the replica sedia tenaglia at castle Loevestein. Another great source which I used was the construction plan of Charles Oakley of a 16th century German folding chair, which is actually an Italian style sedia tenaglia. The thickness and width of the legs of the chair in Castle Loevestein were 2.5 and 4.5 cm, respectively. That of the chair of Charles Oakley was 2.54 and 5.08 cm (1 and 2 inch), respectively. My thoughts were going in the same direction 2.5 and 4 cm, respectively. The thickness changed during construction of the chair to 2.0 cm for reasons explained later. This is still robust enough to sit on, and saves weight.

  
The replica sedia tenaglia at Castle Loevestein, Poederooyen, the Netherlands. This chair does not have a bend backrest. As such it can be nearly flat folded. On the other hand if you lean to much backwards, the chair (with you on it) will tumble backwards. This does not happen if the back of the chair is slightly bend.

Measurements of the folding chair at Castle Loevestein; the width of the chair is approximately 50 cm. The black dots indicate the placement of the pins for the mortise and tenon joints.

As I wanted to have the same seating height for the sedia tenaglia as my x-folding chairs, 44 cm, this measurement was also fixed. I also liked to have a deeper seating plateau than most sedia tenaglia, and chose a depth of 35 cm. Using these sizes, the folding X part of the chair could be drawn. Only the height of the backrest and the curvature of the back were left to be determined. The optimum height for the back of the chair depends on the people for whom it will be made (mainly me and Anne). The optimum curvature depends on the stability of the chair when leaning backwards (i.e. the chair does not tumble backwards when you lean on it), the ergonomics of your back while seating, and the wish to have the chair as flat as possible when folded. I think I succeeded very well in finding the optimum measurements for my sedia tenaglia.

Most of the remaining medieval sedia tenaglia are made from either beech or walnut. I chose oak to make my chair, as the table and all my other chairs were made of oak. Oak is a more difficult material to work with, and tougher to bend. I started to cut and plane the oak to the appropriate thickness and width. The next step was to bend the back, which I will cover in the next post. 

Meanwhile, also the caps for the dowels had to be made. I used tenon cutters in the drill press to make the caps. The trick is to have the piece of oak thicker than the tenon cutter can cut deep. This way, the caps are still attached to the piece of oak which makes is easy to centre the drill bit to make the hole in the centre of the cap to attach it to the dowel. This hole is cut just deep enough to hold the dowel. Then the caps are cut loose with a (Japanese) saw, and if you planned it well, the second round of caps is already waiting for you beneath the previous ones. You just have to drill the centre holes and saw these loose as well. Rounding of the caps is done similarly as with the Savoranola chair: using a belt sander or a rasp.

Seven times two caps are waiting in this piece of oak. 
The tenon cutter has done its job and the first seven caps have their centre hole drilled.

The seven caps are cut from the oak piece along this line (arrow) with a Japanese saw (kataba).

The first seven caps are cut loose; the second row of caps is already present due to the deep drilling of the tenon cutter.

Progress on the Thomasteppich: August 2014 - April 2015

$
0
0

Anne embroidering in the great hall of castle Hernen. The beautiful sun rays were created by the smoke of coming from the fireplace in the next room which had a badly working chimney. Photo made by Geldersch Landschap en Kastelen.

Like the previous progress report on the Thomasteppich embroidery project, I have made a photo for most of the days from August 2014 to April 2015 when Anne did something with her part of the Thomasteppich, and turned these into another small video. During winter time not much was done on the teppich as we were working on our new house. However, the first panels of the tapestry are nearly finished, both that of Anne and Katinka.


Some 'new' strycsitten illuminations

$
0
0
 I have gathered some additional strycsitten images from medieval illuminations and paintings. They can be divided in French type strycsittens and the German type.

French strycsittens


 January, folio 1r. The table is curious and seems to consist of a square dressoir with a round table top.
 
 February, folio 1v. The wife seems to be sitting on a footstool.
Both illuminations are from the same book illuminated by Jean Poyer in Tours, France around 1500. Both strycsittens are situated in front of the fireplace. The Hours of Henry VIII, manuscript MS H 8, The Pierpont Morgan Library, New York, NY, USA.


Servants serving the master in a book of hours. BNF NAL 3116 folio 1v. Dated at the end 15th century. 
Assuming a similar set-up as the previous image, this could be February.

I have shown this image before, but only in grey. It is still unknown to me from which manuscript it originates. 
Also this strycsitten is in front of the fireplace.

 
Feast of Esther. Folio 129v in Fleur des histoires, BNF Fr 55. Second half of the 15th century.

Jehan Froissart kneeling before the count of Foix. Chroniques of Froissart, British Library manuscript Royal 14 D V folio 8. Last quarter of the 15th century. The strycsitten beneath the canopy is decorated with animals (lions?)

Tristan and Dinadan at the house of Pelinier. Manuscrit du Tristan en prose, BNF Fr 102 folio 179v. dated around 1465-1480. It is a bit difficult to see, but  they are sitting on a strycsitten in front of a fireplace.

 
The king is sitting at a strycsitten. 
Facta et dicta memorabilia BNF Fr 43 folio 1. Dated  mid 15th century.

 
The translator reads the Latin text in the library of a noble. A grisaille illumination with a strycsitten in front of the fireplace. The strycsitten swinging backrest is more of a Flemish type. The bench is covered with a cloth and a cushion. Roman de Jean dÁvesnes. Paris, Arsenal MS. 5208 f. 1r. 15th century.

German strycsittens

 
Cardinal Albrect of Brandenburg as St. Jerome. Painting by Lucas Cranach the Elder (1526). The painting is in a private collection. A special long green cushion is made for the strycsitten. The table is set on a wooden platform; perhaps to protect it from the animal dung?

  
Detail of the high altar painted by Friedrich Herlin (1466) showing a strycsitten.  
St. Jacob Church, Rothenburg ob der Tauber, Germany.

St. John with eagle on a strycsitten. Painting by Gabriel Maleskircher (1478). 
Museo Thyssen Bornemisza, Madrid, Spain.


Making a sedia tenaglia part 2 - steam bending

$
0
0
Did steam bending of furniture exist in medieval times? That is a difficult question to answer. It is very likely that it did exist. At least the technique was used in the medieval body-building industry. Wooden planks for the hull had to be bend before they were clinked with nails to the frame and the overlapping planks, and this was much easier to do with the help of steam.  Archaeological finds of lapstrake built boats also confirm that steaming of the wooden planks was used in boat building.

Noah building the ark. A favourite medieval boat-building scene. You can see that the boat is nailed and lapstrake built, but no steam-bending is being done here. Histoire Ancienne jusqu'à César. Manuscript Add. 15268 folio 7v. British Library, London, UK.
 
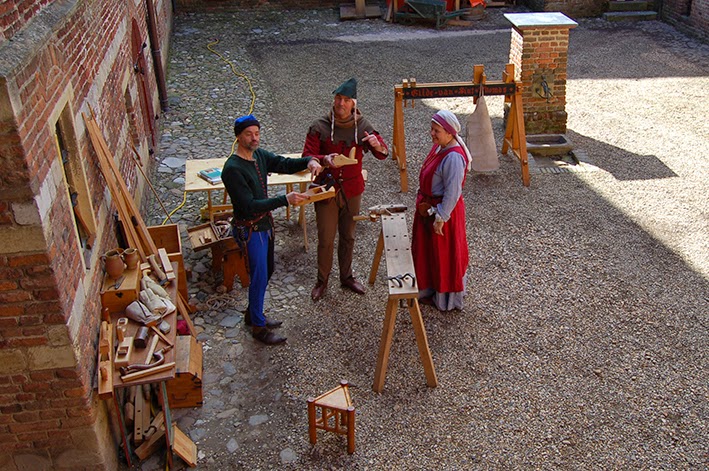
A reconstructed steam-bending scene from the Vasa Museet (Stockholm, Sweden). 
The Vasa was built in 1626-1627.

Another indication that (steam)bending was used in a more medieval house-hold context are the splint boxes. These boxes were already known in early medieval times (e.g. grave finds from Oberflacht in Germany, 6-7th century) and are still in use. Thin pieces (a few mm thick) of wood were bent with help of water, heat and steam to make oval or round forms. More on medieval splint boxes can be found on the blog of the Wienische Hantwërcliute 1350.


Spanschachtel box from the Augustinerchorfrauenstift Steterburg, 1st half of 14th century. Height 11 cm, length 29 cm, width 20 cm . Now in the Herzog Anton Ulrichs-Museum, Braunsweig, Germany. 

Medieval splint box with its contents: a mandrake in silk wrappings. The box was found under the choir stalls in Kloster Wienhausen, Germany. Image scanned from the booklet 'Der Fund vom Nonnenchor' by Horst Appuhn.


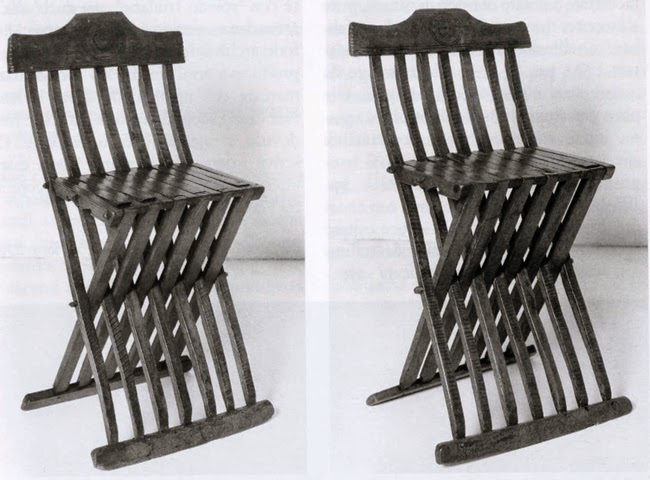
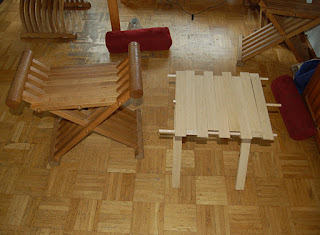
Whether medieval furniture also was made from steam-bend wood is not clear. Some photos of extant pieces suggest that they were bend, but no information is given if this was really the case. Nor have I been able to check if the wood grain of these chairs follows the flow of the bend rails. Anyway, I have used the steambending technique for my sedia tenaglia.

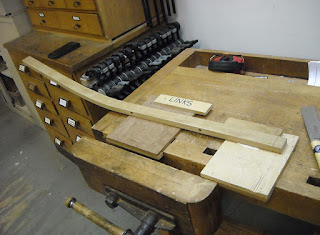
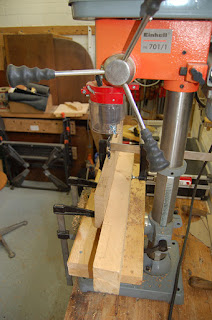
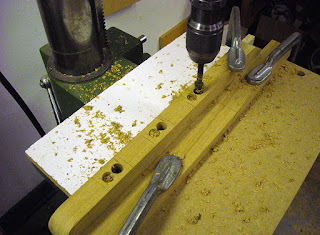
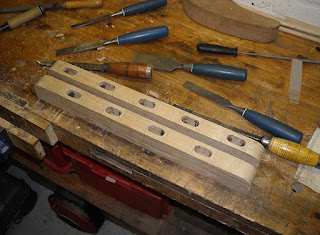
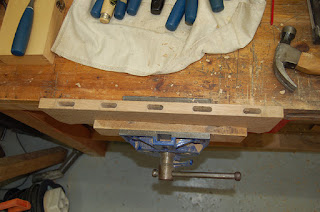
Making the bending jig

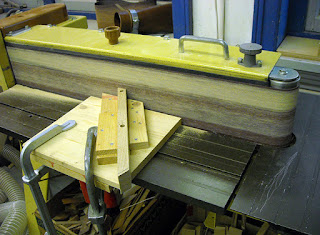
To steam-bend wood a bending jig is necessary. The wood is pressed against the jig and takes the shape of the jig. My bending jig was made of two pieces of 2 cm mdf board, which was glued together to get a 4 cm thick board, i.e. the same width as the wooden rails. I roughly used my plan of sedia tenaglia to transfer the curves to the mdf board. Then, I hammered some nails along this first sketch of the curve and placed a thin strip of wood against it. This thin strip bends easily and forms a natural flowing curve, while being kept in place by the nails. The final curve of the wooden strip was now transferred on the mdf board with help of a pencil. A band-saw was used to saw the curve, and a belt sander to smoothen it. 

 
Glueing the two pieces of mdf to get a 4 cm thick board.

 
Using nails and a thin strip of wood (triplex)  to crate a natural flowing curve. The lines of the initial measurements can be seen on the mdf.

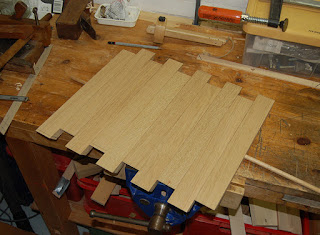
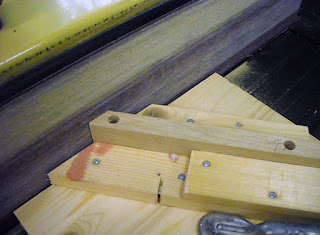
As all the wooden legs need to have the same curve, some additional part were needed for the bending jig. An end-stop was needed to ensure that the curve started at the same point for each leg. A flattening clamp was needed to ensure that no bending occurred below that point (i.e. the part of the X needs to be straight, only the backrest needs bending). The flattening clamp also made it possible to quickly slide the steamed leg into the jig.
 

The end stop and the flattening clamp of the bending jig.

Here you can see the jig with an unsteamed leg inside it. The arrows show the part that will be kept straight
 and the part that will form the bended backrest. 
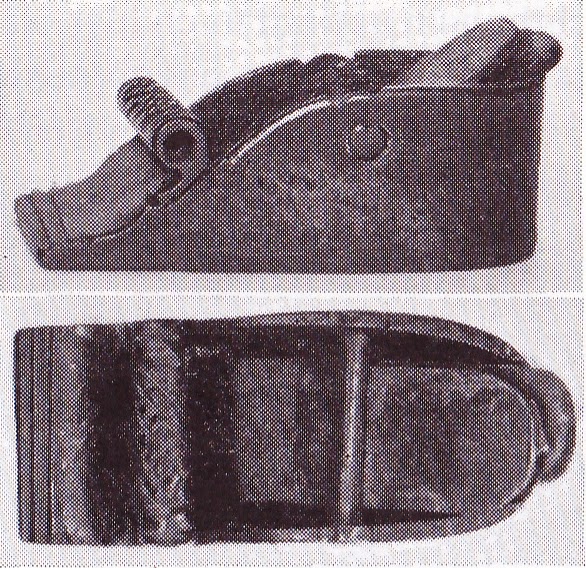
The steambox

The steambox - used to steam the wooden rails - is modern made from laminated plywood. The inner edges are sealed with silicon kit. The ground surface has a slight angle towards the middle, so the that condensed steam will flow back into the kettle. In the middle of the box is a hole with a PVC pipe connected to (the lid of) a glue box beneath which is filled with water. The glue box is placed on an electric heater. Another version of a steambox can be found on the blog of Johann von Katzenelnbogen, who makes traditional and early medieval handcrafted furniture.

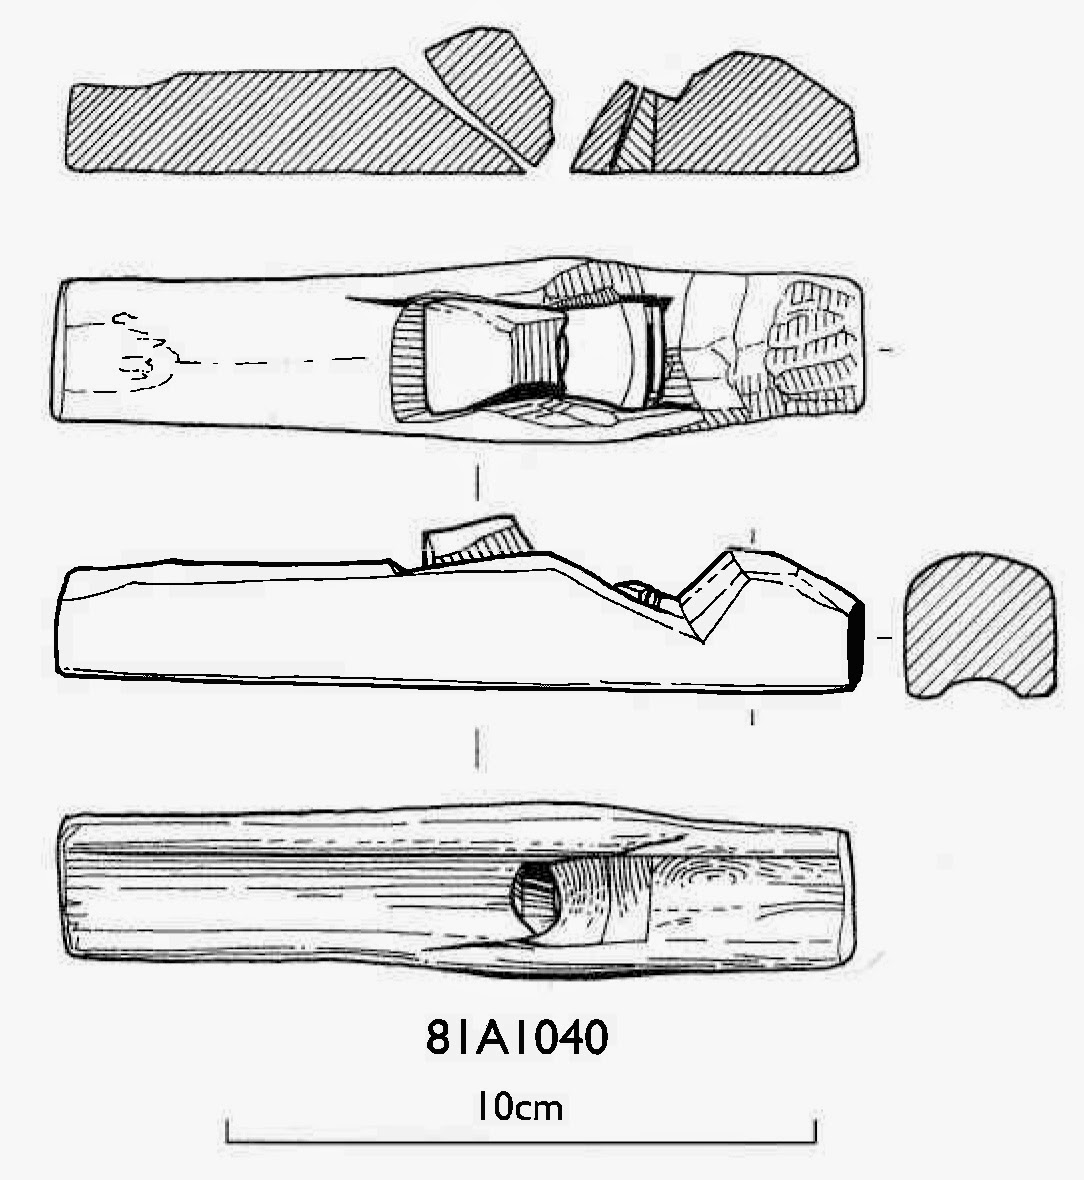
Schematic overview of the steambox.


The plywood steambox with the gluepot and the electric heater in the middle. 
On top of the steambox is a lid with two handles.

Two legs of my sedia tenaglia could be placed together in the steam box. They rest on wooden blocks so they do not get unevenly wet by the condensed water whichis flowing back to the PVC pipe/glue-pot.

Inside the steam box. Two legs are waiting on small wooden blocks. 
You can see the hole for the steam and the returning condensed water.

The steam-bending process

The wooden legs stayed in the steambox between half an hour to one hour. One at a time was taken out of the steambox with fingered oven mitts (initially the wood and the steam are hot) and quickly put into the jig. Then clamps were applied, starting from the middle and following the bend towards the end. It is necessary to have wooden blocks between the clamps and the steamed wood to spread the pressure. If you do not do this, the clamps will produce dents in the wood, which are difficult to remove. (With help of a clothes iron with steam you can try to inflate the dent again, but you must take care not to burn the wood instead). After half an hour, when the wood had cooled down, the clamps were removed and the bended rail was transferred to a spare jig, were it was clamped again for some hours. Meanwhile, the first jig could be used to bend the second rail.

The first leg I tried to bend was about one cm thicker than the ones finally I used for the chair. The thicker leg could not be bend properly and veered back to a wrong angle. Perhaps this was due to a too short time in the steambox, but I decided to reduce the thickness of the rails. The thinner rails all bended perfectly well (except one that splintered), finally resulting in a chair having a lighter weight.


It is necessary to use wooden blocks between the iron clamps and the steamed leg of the chair. Steamed wood is soft and the pressure of the clamp will leave an ugly dent in the leg if no block is used to spread the pressure evenly.

At the straight end, hardly any iron camps are used.

Clamping starts at the straight end and then follows to the end of the curve.
 Sometimes the pressure of the previous clamps has to be increased when the bending proceeds.

Not all bending goes well. This leg cracked and split during the bending process. 
I had to make another one. Luckily it happened only once.

I will conclude the making of the sedia tenaglia in a next post.

St. Thomas on holiday

$
0
0
A few months and it already time for this years summer holidays. Last year we (both Thomasguild families) went to northern Germany, but to separate locations. Marijn and Anne stayed around the hanseatic city of Lübeck, while Bram and Katinka went further north to the Gothic brick cities of Wismar, Greifswald and Stralsund. During our holidays we (of course) visited some musea, old churches and buildings, etc. and did find some medieval images and statues of our patron saint, St. Thomas.

 The altarpiece of the Thomasbruderschaft der brauerknechte.
From the Burgkiche in Lübeck, now in the St. Annenmuseum.

In Lübeck in the St. Annenmuseum Marijn and Anne encountered many Thomasses. The museum houses a large medieval collection, mainly religiously based, and mostly retrieved from the bombed churches in the second world war. One of the finest pieces was a special altar dedicated to him, although our saint had to share it with the two other Thomas saints, Aquino and Beckett. This altarpiece of the Thomasbruderschaft der Brauerknechte (the Thomas brotherhood of the brewers) from the Burgkirche in Lübeck dates from around 1520. It consists of a gilded shrine with sculptures by the Master of the Burgkirchealtars, and painted panels by Erhart Altdorfer and the Master of the Thomasaltar. The shrine is 2.32 metre high and 1.3 m wide, with a depth of 26 cm. The altar wings are 62 cm wide and 17.5 cm deep. The predella (the lower part of the altar) has a height of 94 cm height, a width of 2.84 metre and a depth of 49 cm. There are some marks of the makers of the shrine left on the backside of the altar piece, but unfortunately not visible for us.

The lower middle part of the altar piece with from left to right: Thomas of Aquino, Apostle Thomas and Thomas Beckett.

Part of the predella, with the unbelieving St. Thomas and Christ in the middle.

The backside of the right group of apostles from the predella.
 You can see that the backside of the sculpture is roughly hollowed out.

An old black and white image of the complete altarpiece, but with the parts mixed up.

A part of the high altar from the Marienkirche has a painting on an oak panel of two apostles, of which one is St. Thomas and the other St. Paul or St. Matthias. The painting dates from around 1420 and was made by Conrad von Soest or a successor.

The Apostle on the right is St. Thomas.

Another painting from an altar piece of the Valentinsbruderschaft shows another part of the legend of St. Thomas. He was absent during the death of Maria, and therefore was witness to her ascendency to heaven. Maria did give him her belt (with help of an angel) to show as proof. The painting was made between 1490-1500 by Wilm Dedeke on the wings of the predella.

An angel gives the belt of Maria to Apostle Thomas. Altar piece of the Valentinsbruderschaft.

The following are some remarkable oak statues from an altar from Molln. The statues were made in Lübeck around 1395-1400 and now reside in the St. Annenmuseum. Thomas has a spear in his hand. The two other statues are of St. Simon. He has a saw as an attribute, because he was martyred by being sawn in half lengthwise. One Simon carries an M-toothed cross-cut saw. This is (sofar) the earliest image of such an M-toothed saw, and decades earlier than the saws mentioned in the blogpost on two man cross-cut saws (1450-1475). The other one is more like the two-handed push saw. The back of the statues are hollowed out. The original colour of the statues has been gone, although some traces of bolus remain.


St. Thomas (left) and St. Simon (middle and right) from the altarpiece from Molln.

  
The hollow backside of St. Simon.

In nearby Ratzeburg, Marijn and Anne visited the Dom, in which an altar resides from the end of the 15th century. One of the apostles on the wings of the altar was Thomas. The Thomasses met by Bram and Katinka will likely be presented by them in a blogpost.

St. Thomas with spear (left photo) and St. Simon with saw (right photo) from the altar piece of the Ratzeburger Dom. 

Source

The St. Annenmuseum does not allow photography, but a catalogue of the medieval wooden pieces is available. The images were scanned from this book: Corpus des Mittelalterlichen Holzsculptur and Tafelmalerei in Schleswig-Holstein. Band I. Hansestadt Lübeck, St. Annen-Museum. edited by U. Albrecht. Verlag Ludwig. ISBN 978-3-933598-75-2.

Thomasteppich: the first panel finished!

$
0
0
Last weekend we were at the historic open air museum in Eindhoven, the Netherlands. While the men of the St.Thomasguild did all the hard work, the ladies were very busy embroidering. But with results! The first panel of the tapestry was finished; and the second one is nearly finished as well!

It was indeed hard labour for the men of the St. Thomasguild ...

 The first panel finished. Details and faces that were also on the original tapestry, but have disappeared (or better faded) through time.

Katinka's panel is also nearing completion. At the end of the day she only needed to do a small piece of green and the details of the faces.

With the first panel finished Anne moved the canvas roll to the next the next scene of the Thomasteppich: St. Thomas spending the money for the King's palace to the poor and his imprisonment. But there was a surprise! We we unrolled the canvas it became apparent that some years ago Anne already had outlined some of the scenes and windows with black wool. The new canvas panel was fastened again with extra thick thread (as shown in a previous post in July 2013) at the short sides first, followed by the long sides. The tensioning is necessary, as embroidery will cause the canvas to "shrink". When we measured both the embroidered panel and the unembroidered canvas, a difference of 1 cm had occurred. This difference would have been much larger without tensioning of the canvas.

  
The next scene is unfurled ... with already some embroidery on it!


First the short sides of the frame are attached to the frame, followed by the long side. Note that the thread is first attached in the middle of the frame.

The second panel at the end of the weekend. One the left side, a horse of the first panel is watching the new scene. You can also see the difference in height of the embroidered and unembroidered piece.

'Do you think we get some apples at the end of the day?''No, Thomas will surely give them to the poor - as always'

'Sire, I have seen Thomas cheating on you with your gold. You must take care of this untrustworthy unbeliever'"I will send my noble knight to seize him!

'Here rides the gallant knight on his noble quest, to imprison the vile stinkard Thomas.'


The medieval toolchest: the plane part 1 revisited

$
0
0
Sometimes you encounter a little gem when looking in books or browsing through the internet. This happened a week ago when I found a painting of  Saint Peter Martyr Healing the leg of a young man at the digital images of the Metropolitan Museum of Art. The painting of tempera and gold on a wooden panel is Italian and made by Antonio Vivarini around 1450. The painting belongs to a set of 8 panel all set around Saint Peter Martyr (1205-1252). Antonio Vivarini had his workshop in Venice. This particular scene depicts Saint Peter Martyr miraculously healing a young man who, remorseful at having kicked his mother, had cut off his leg. The scene, however, is set at a carpenters workshop and more likely depicts a carpenter who has hit himself with a (single bevel) broad axe in his leg while squaring the log. 


More interesting on the panel are the tools. First is the large Italian style try or jointer plane hanging on the wall next to frame saw. Typically, as already mentioned in the blogpost on Italian style medieval planes, is the hollowed out hand-grip at the end of the plane. Also the frame saw is worth mentioning. The blade of the saw has belly shape. Finally interesting to mention is the collection of sawn wooden planks standing against the wall, showing that they were indeed common during the late middle ages.

Making a sedia tenaglia - Part 3: completing the chair

$
0
0
This post is the third and final part of the story of making a sedia tenaglia. The two previous parts can be found here and here. The plan of the sedia tenaglia can be found below.

 
The plan of the sedia tenaglia. Note that the angle is set at 55 degrees, and this angle also is used for the seating rails. The dotted line left indicates the size of the steam-bending jig. Left is a frontal view, which distorts the actual length of the rails. The dotted horizontal line is the place of the dowel in the centre of the X. The proposed decoration on the head board was not carved as the chair needed to fit with the other folding chairs.

The bended backrest rails were now cut to length. The bending made it difficult to use a normal bench-hook as the rail refused to lay flat. A piece of double-sided tape on the bench-hook kept the rail stable enough to be sawn.

Left:  The bench-hook adjusted for sawing the bended rail with a piece of double sided tape. Right: The weight at the bended end of the rail pulls it upwards. The piece of sticky tape keeps it down on the bench-hook.

All the other rails for the seating and the legs were now cut and planed to have the same thickness of 2 cm as the bended backrest rail. The ends of the seating rails were having an angle of 55 degrees. All the rails now needed to have their edges (of the long sides) chamfered. This was done with help of a router table. For the straight rails this was quite easy as they could stably rest against the fence of the router. For the bended backrest rails this was not possible, as the fence interfered with the routing process and needed to be removed. Therefore, these rails had to be stabilized differently. This was solved by adding two pieces of extra wood with a C-clamp at the edges of the rails. 

Left: Chamfering the straight rails with the router with help of the router fence. Right: The bended rail is stabilized by clamping two extra wooden blocks at the edges.

After that the holes for the dowels were drilled in each rail. A jig was made for the drill press to be sure the holes were drilled at exactly the same place in each rail (otherwise you cannot construct and fold the chair). Also the drilled holes were rounded of using a cross-hole countersink bit.

Left: The drill jig for the rails of the sedia tenaglia. The rails just have to be inserted and clamped. The stop at the end ensures that the hole is drilled at exactly the same place. Right: The holes for the dowel are rounded with a cross-hole countersink bit. No clamping is needed here, the bit centres itself.

Left: All the seating rails connected by the middle dowel rod. Right: This photo nicely displays the difference in placement of the "X" between the sedia tenaglia and a normal X-chair. Both chairs have the same seating height and are in the same seating position. Not that only four (front)legs are used. The bended rails with the backrest were not yet drilled.


When all rails were drilled the chair was test-constructed. Where needed the rails of the seating and the front legs were adjusted using a belt sander in order to get a flat seating level.


Two views of the chair. You can see on the right photo that one of the rails of the backrest has bended slightly less. However, when the top board of the chair is added, it will automatically be forced to the same bending angle as the other rails. The dowel rods have a thickness of 10 mm.


An 55 degree jig is used to adjust the seating rails on the belt sander.


The final flat seating of the sedia tenaglia.

Now the top board and the rails of the feet had to be added to the chair. A row of mortise and tenon joints was used, which were fixed by two (feet) or three (head) wooden dowels. The tenons were sawn and rounded off with a file. This was done because I made the mortises with help of the drill press - thus producing a rounded mortise - and rounding a tenon was less work than squaring the mortises. A difference nobody will notice looking at the chair.

The sawn square tenon and the filed round tenon.

A set of finished tenons.


Drilling the mortise in the top board of the sedia tenaglia. The jig ensures the holes are placed correctly in the middle. The board can slide within the jig.

  
 Left: The same type of construction was used for the feet rails. Right: The front and back feet rails have a different number of mortises.


After drilling the mortises were cleaned with a chisel.

The feet rails now were having the same angle (55 degrees) as the legs of the chair, meaning they were standing on one point. To have a larger contact area with the ground, the feet rails were planed flat. A spirit level was used to check if both rails were equally planed. After that, the caps were glued onto the dowel rods. Finally, the chair was finished with a linseed oil coating.


The chair was fastened with the seating to the workbench with a clamp; another clamp was used to fix all the rails together. An old wooden Stanley Bailey no. 5 was used to flatten the feet rails.


The finished sedia tenaglia in front of the fireplace at Castle Hernen, the Netherlands.

Viewing all 205 articles
Browse latest View live